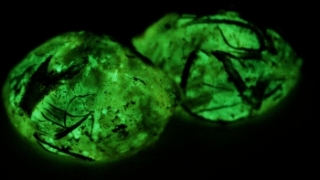
 The above image is a motion gif of a luminous hickory nut shell showing the transition from room lighting to total darkness. This posting will explain how it was done.
Background:
One evening while walking through a small section of woods my wife noticed something glowing just off the trail. The object turned out to be hickory nut shell with some kind of luminous fungi or bacteria causing it to glow. We took it back home with us to take pictures. Since I didn’t know how long it would continue to glow I did a very quick photo setup by placing the nuts on a piece of white paper in a small dark room and mounted my camera on tripod.
I did several exposures using the camera self timer to avoid shake. I took pictures under room lighting as well as in total darkness.
Making the motion gif:
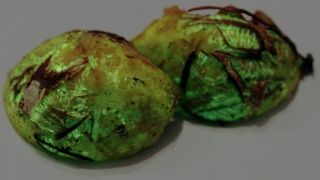
I thought the best way to display these images was as a motion gif showing a gradual change from room lighting to total darkness using the best two light and dark images. The first challenge was to crop the two images exactly the same so the the alignment was would be unchanged. The easiest way was to open the light image in GIMP and then load the dark image into a second layer. After cropping the image I saved the light and dark layers as separate images. Here you can see the two cropped images I choose to use.
The next step was to create the intermediate images showing the light to dark transitions. I could have done that in GIMP by blending the light layer (top) and dark layer (bottom) going from 100% opacity to zero opacity and saving each step as an image but that would be a very slow process. I suspected imagemagick had a more script friendly way of accomplishing the same task. Checking the imagemagick site I found a very simple way of doing a layer blend. A 50% blend for example could be accomplished with this command: composite -blend 50% dark.tif light.tif blended.tif
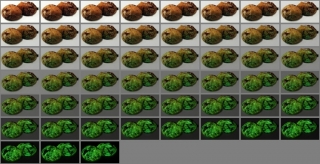
Now all I had to do was create a script that would make a series of intermediate images blended from 0 to 100%. Here is the bash script I developed. for AMOUNT in {00..100..2} do composite -resize 200x -blend ${AMOUNT}% dark.tif light.tif out-${AMOUNT}.jpg done This script changes the for loop variable “AMOUNT’ from zero to 100 in steps of two (000,002,004….098,100). Notice the zero is represented by ’00’ instead of ‘0’. This is a bash shell feature that makes sure single digit numbers are represented with two leading zeros. This insures that wildcard (glob) filenames sort correctly. Otherwise you would have frames 2 and 20 next to each other in the completed motion gif. I know this from personal experience 🙂 Note: I normally like to use tif files for intermediate steps like this, but for some reason the animated gif created from tif’s had green noise (snow) so I used the jpg format. A -resize command is used to downsize the images to a width of 200 pixels to reduce the file size of the final gif file After running this script we have a nice series of blended images that look like this: Click to enlarge.
montage -resize 100x -geometry +2+2 -background grey50 out-*.jpg montage.jpg The next step is to create the actual motion gif. Please check http://www.imagemagick.org/Usage/anim_basics/ for more information on this subject. Here is the first command I used to get a functioning motion gif: convert -dispose none -colors 256 -delay 5 -loop 0 out*.jpg motion.gif The code reduces the colors to 256, the delay between frames is 5/100’s of a second, the animation loops infinitely. The “-dispose none” option indicates the previous frame should not be thrown away but is overlayed by the next image.  I wasn’t happy with this gif. The transition from the light frame to the dark frame began immediately with no time to study the image before the transition began. Likewise the last frame immediately switched back to the first frame without any time to admire the glowing nut. Returning to the imagemagick site I found a way to set a longer delay on the first and last frames. This technique takes a preexisting animation and outputs a new version with the altered timing. The script was rewritten to use the two step process. The first convert command creates the animation in the miff format since imagemagick recommended this format for intermediate animation files. Here is the actual code:
 convert -dispose none -colors 256 -delay 5 -loop 0 out*.jpg motion-tmp.miff; convert motion-tmp.miff \( -clone 0 -set delay 150 \) -swap 0 +delete \ \( -clone 50 -set delay 200 \) +swap +delete motion.gif The syntax of the second convert command is a bit confusing and needs some explanation. The code that changes the delay of the first frame is: \( -clone 0 -set delay 150 \) -swap 0 +delete Parentheses are used to group the code section that says make a clone of frame 0 and set the delay to 1.5 seconds. The parentheses are ‘escaped’ with a backslash since this is written for a linux bash shell. The part that reads ” -swap 0 +delete” indicates that the new cloned frame is to be swapped with frame 0 and the old frame deleted. The timing of the last frame is handled by the section: \( -clone 50 -set delay 200 \) +swap +delete This clones frame 50, the last frame, and sets a delay of 2 seconds. The “+swap +delete” (as opposed to “-swap) will swap the last two images in the image list, substituting the cloned image with the original then delete the original  This is what I wanted. A smallish file, with adequate color depth, and some time to appreciate the before and after images.
Conclusion:
For your own projects you can change the delay and image size as needed but remember longer delays will make for a choppy video and a large image size will yield large file size and slower download. I hope you found this information helpful. Thanks for visiting this site! Jim


